Showing posts with label Pebbles. Show all posts

Monday, March 16, 2020

Die Cutting and Embossing with the We R Memory Keepers Revolution

Die cutting and embossing are my two favorite card-making techniques! And while I love using them for cards, they are also awesome for scrapbook layouts as well! We R Memory Keepers has a new manual die cutting machine out called the Revolution. It is really smooth and creates clean cuts and deep embosses!

The plates and platform are so easy to use. The base is also magnetic, making it easy to keep your dies in place while passing everything through the machine.

See how clearly everything is labeled? So smart! So easy!

Check out the details on the white card stock circle! Visit the We R Memory Keepers Blog for way more details and visit me on Instagram @kimberlystamps for a video look at the Revolution!

Thinking of you all in these unusual days. Stay healthy. Stay safe. Stay home. Praying for everyone in the days ahead. Sending you much love and a massive, socially-distant, hug!

Sincerely Yours,
Supplies used. Affiliate links shared here. Thank you for supporting my family in this way!

Monday, October 7, 2019

Die cutting + Planner Pages

Honestly, I never thought about die cutting for my planner pages. It never crossed my mind. But my assignment for We R Memory Keepers was just that. Boy, am I glad it was, because I have a TON of ideas for incorporating die cutting into my planner pages!

I started off slowly. I had this cute, but basic bat clothespin from Pebbles, Inc. I added a die cut circle of patterned paper and a suuuper cute brad. Ok, cute idea. But what else?

Well, I wanted to layer this pre-made tag on the page. So, why not die cut a cute banner for more color and a change of shape? Done and more cuteness. Now this was becoming pretty fun!

Then I remembered this cool label tape and embossing folders I had...adorable borders with dimension! EEEEE!! 

Finally I needed to add a space for my days. I was going to draw them with a pen, but as I flipped through my stash of dies and saw some scalloped frames from My Favorite Things the lightbulb went off! I think I will be using these squares all the time! They add texture, color, and a whole lot of cuteness! For the complete details on this layout, visit the We R Memory Keepers Blog today!

So have you ever used die cuts in your planner?

Sincerely Yours,
Affiliate links used. Thank you for supporting me and my family this way! :D

Wednesday, July 17, 2019

simple and sweet shaker cards with WRMK Clear Cut Punch Mini

Ahhh, summertime. Warm temps, days at the pool, late nights chasing lightning bugs and toasting marshmallows...and you need a card for tomorrow?!?!? 

Hang on, no worries, once again We R Memory Keepers has a tool that will make quick, adorable, and even interactive cards in minutes! Say hello to the Mini Clear Cut Punch! Clear Cut Punches allow you to see what you are punching. Like an image? A letter? A part of your patterned paper? No problem, cut it away easily with this magnetic punch! A follow-up to the regular-sized punches, these Mini Clear Cut Punches are fun for card-making!

Matching my punches up with these super sweet papers from Pebbles, made for quick and easy shaker cards. So easy, you can include the kiddos in the process. Which, is always wonderful!

Check out the full tutorial on the We R Memory Keepers Blog and if you want to see more about the punches and how they work, pop on over and visit my Stories on Instagram. You can find me @kimberlystamps .

Sincerely Yours,
Supplies. Listed with affiliate links. Thank you for supporting my family this way!

Tuesday, February 5, 2019

Love Bugs for Valentine's Day

I don't think the word "bug" describes these cuties appropriately! At all! Because they are so stinking cute!!! Remember these from when you were a kid? The pom pom with the feet that were a sticker? Oh, they were so much fun! With some of my We R Memory Keepers tools, I just HAD to make some of my own!

I started with the medium Pom Pom maker and some soft yarn I found at Michael's. The pom poms are easy to make with this little tool and I was surprised at how perfectly they turned out. Sure beats trying to make them with your hands!

I placed the finished pom poms on felt hearts that I die cut. My favorite glue for these projects is Aleene's Tacky Glue. Always a winner! Plus, with the easy clean-up you can make these with your kiddos! (In fact, mine is STILL making them...)

Seriously, how can you not smile?!?!

The heart-shaped antennae were created with the We R Memory Keepers Happy Jig. This wire-shaping tool is fun. I placed three pegs in the board in a triangle shape and wrapped the wire around it, to create the heart shape. I placed the end of the wire down in the glue, making a very thick coat. Then I placed the wire down in the pom pom. It held in place beautifully, especially if I held it in place for a few seconds. 

I finished my new fuzzy friends off with sweet Valentine's Day tags from the Loves Me Collection from Pebbles. I wish I could hand you the whole pile of them and watch you smile!

Oh, and a note to your future self, never, ever, under any circumstances purge your googly eyes from your crafty stash. Don't do it. Because the minute you do, you WILL need them. Ha!

Sincerely Yours,
Supplies. Affiliate links used. Thank you for purchasing via my links!

Wednesday, January 23, 2019

never ruin a card again! We R Memory Keepers Precision Press Advanced

Oooh, it's time to kick off the next year worth of posts for We R Memory Keepers! I am thrilled to be a part of the team again this year! There are SO many wonderful new products ahead and I cannot wait to share them with you!!

Up today on the We R Memory Keepers blog is the Precision Press Advanced. This stamping platform can change how you stamp and just wait until you see the new tools coming out to go with it! I am BLOWN AWAY! Hint-stencils!!!!

I used the Precision Press Advanced to help me perfectly line up my stamp on my die cut heart. Because I don't know about you, but I have ruined about a million and a half cards and die cuts over the years by missing. There is nothing worse! Head over to the blog to read more about how to never ruin a card again!

I also took another new tool for a spin on this card- the Stitch Happy Pen! I have another post coming soon with it! And be sure and follow me on Instagram, @kimberlystamps, to watch videos with tips and tricks for all these great tools!


Sincerely Yours,


Supplies. Listed with affiliate links. Thank you for making a purchase this way!

Sunday, December 30, 2018

Happy New Year - a look back at 2018


Its almost time to ring in a new year! Hard to believe that 2019 is here already! 

I thought it would be fun to look back on a few of my favorite projects for the year. Underneath each photo, I will share a link to the original post. So if you want to learn more, or are interested in the products used, you can find it quickly and easily.

This first card may possibly be my favorite of the year. Reason being is, I envisioned this card quite a long time ago. Then, I was able to bring it to life, not only by creating it, but also using products that I designed! Once again releasing products with Papertrey Ink has been quite surreal! Its a huge learning curve each and every time. I am grateful for the challenge. But most of all, I am beyond thrilled when I see someone else using my products. Its indescribable really. Thank you for wanting to use the products that start as a crazy idea in my head. It truly is sharing a piece of yourself with the world when you design products. Thank you for encouraging me with your purchases!

More craziness from inside my head. When I designed Color Block Stencils, I wanted the creation of a trendy, yet timeless, color blocked background to be simple. These stencils allow you to ink unique backgrounds easily, as they line up with the outside of a standard A2 card.

Bold Basics was a stamp set that I also designed to work with Color Block Stencils. How elegant is this card when paired with florals?! The color combinations are endless. From girly to a card for the guys, I am very proud of the stencils!

This Love Word die is another one of my designs, but this carries an even larger piece of me as that is my very own handlettering! I was writing the word for a lettering challenge and Jennifer McGuire saw it and said she NEEDED it as a die! After I picked myself up off the floor, of COURSE I made it into a die! :D 

While this word die was released for the wedding season, with Valentine's Day approaching, I will be taking it out again!! For a video tutorial on this die and all the creative ways you can use it click here: 10 Ways to Be Creative with Die Cut Words

This card is on the top of my favorites list for sure! Colored pencils combined with a beautiful stencil from Gina K Designs! Stencils are a personal favorite tool for me. So much so, that I created a video tutorial showing you: 

This card started my obsession with a fall color palette. It was inspired by a floral arrangement I saw at Michael's. Fresh and trendy, I continued to be head-over-heels for it for months! The gorgeous image from Gina K Designs didn't hurt things either. Also, pop over to the blog post and check out how an accident made a lovely accent on this card! 

My favorite fall color palette paired up with a Die Kit of the Month from Spellbinders on this card. Along with sneaking in my own Color Block Stencils. I still love gold...


More Spellbinders fun, along with Pebbles. Pebbles has this sweet aesthetic that always calls to me. I guess you could say it is my happy place for supplies! 
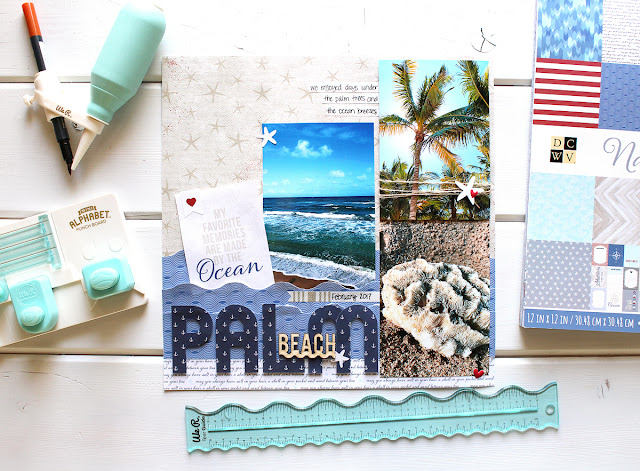

I had to share a layout for this year. I still love taking photos. So much. But, I often forget to share them. This layout was of a trip my husband and I took in February. My husband was a finalist for Engineer of the Year at his company. It was an impressive feat as there are over 6,000 engineers in his company! We were taken on an all-expenses paid trip to Palm Beach, Florida. However, our first trip alone in over 8 years was quickly ruined as we both came down with Influenza A. We spent the time in bed with Tylenol, in a stunning hotel, on the ocean. Glad I was able to capture a few lovely shots of the scenery before it all hit!
At least we were together...

Mail It Monday moved itself over to Instagram and the community has grown immensely! There are over 1400 card-mailers joining in each week! Encouraging one another to mail cards. We share card drives for those needing extra love. Friendships have been formed. Small groups of card exchanges have begun. Its been so wonderful to watch how it grows. We would love for you to join in as well! Find Mail It Monday on Instagram. And if you want to become involved, simply post with the hashtag #mailitmonday. Your post will remind people to send love, send cards.

Once again, I want to end this year full of thanks and gratitude. Thank you for continuing to visit me here and on Instagram and on YouTube. Thank you for the comments, emails, and messages. I love them all---from kind comments to questions! Thank you for purchasing items through my affiliate links.When you click, you sent a small amount of money back my way. Those purchases help pay for swim lessons, tuba lessons, bass guitar lessons, and more. Being able to help my family in this way means so very much to me! I would hug you, if I could! Thank you for continuing to love the paper crafting industry. For supporting all the small businesses run by moms like me. Thank you for buying my stamps and dies as well! Thank you friends, thank you from the very bottom of my heart. Hey, from the very tips of my toes!

Happiest of New Years to you and yours! May 2019 be full of more happiness than sadness, more love than loss, and more wonderful moments of life!

Sincerely Yours,
All supplies are linked in the original posts. Thank you!
Thursday, November 8, 2018

pockets full of thanks

Can we ever give enough thanks? Can we ever say thank you enough? I certainly do not think so. As we enter this season of thankfulness and gratitude, the time to express our thanks is at hand. No reason not to send someone a handmade card telling them how much they are appreciated! My assignment this week for We R Memory Keepers was exactly what I needed to create. When those stars align, it always makes for beautiful projects because of the love behind their creation.

I have been hoarding or saving or whatever you want to say, this paper from Pebbles for a loooong time. The paper is full of beautiful tags with words of thanks. When I got the new Pocket Punch Board from We R Memory Keepers, I FINALLY had the perfect way to use those tags! By creating pockets on my cards, I had a place to put the tags. The Pocket Punch Board is crazy easy to use, and like all their awesome tools, it comes with a guide to help you create pockets in just about any dimension you could possibly need! 

Visit the We R Memory Keepers blog for more details on these cards and the tools. Plus, you know me and how I love to ramble on and make bad jokes that only I laugh at. Ha! 

Sincerely Yours,
Supplies, affiliate links used:

Thursday, October 18, 2018

Halloween Decor - String Art with Eyelets

So I love the look of string art, but me and a hammer and nails really is not a good idea. Seriously, even ask my 12-year-old! Ha! But when I was assigned to make a piece of Halloween decor, I knew I could create the look with eyelets!

I could not be more thrilled at how this turned out! Its SO crazy cute! It was pretty easy to make. All I needed was a pencil, ruler, eyelets, and a Cropodile Big Bite. Be sure and visit the We R Memory Keepers blog for all the instructions and a few tips!

To add to the seasonal look of this framed project, I used Pebbles Spooky Boo collection. I mean, read this sticker! Caution: may contain traces of spiders! Ha! 

Sincerely Yours,
Supplies. Affiliate links used.
Related Posts Plugin for WordPress, Blogger...