Ho! Ho! Ho! Merry Christmas! Ok, we haven't even reached fall here yet, but it IS time to start thinking about creating your handmade Christmas cards. The Holiday Die D-Lites release from Spellbinders will surely excite you to get designing and creating! How could you not with these adorable characters?!?!
I am just going to give you a little peek at what I created for Spellbinders this month, because I would love for you to visit their blog and check out my entire post. These cuties are all stepped up with some quick and easy techniques. And while they look incredible, adding a few extra touches didn't take much time!
For example-see how I used a die template as a stencil on Santa's beard!
Color pencil and some ink add huge dimension to die cut images.
And yes, these die cut images have all the amazing details you would expect from Spellbinders, but its Christmas, I always want to add something extra to everything!
More simple techniques on this guy too! Multiple colors of cardstock, inking, and don't forget my favorite trick of all-time...well, you will have to head over to the blog and read for yourself! :D
One stencil, that is all it took to create these 7 unique and different cards. Pretty amazing what you can create with one awesome tool like a stencil! I fell in love with the Art Stencil Floral from Gina K Designs and I had more fun playing with it! So, I made a video tutorial for you on all the techniques I used. Each card has its own section in the video that is quick and short, but hopefully inspires you to give a few of these cool looks a try!
First up, color pencil. This one doesn't need much explaining, Simply color and add details!
This card above is embossing with highlights from wax paste!
Gold foiling on clear transparencies? How elegant is this?! Special products from Therm O Web create this amazing look! All the supplies used are listed below.
Light modeling paste and the fabulous new ink colors from Gina K Designs. So easy, and so much pop! After adding the ink, I trimmed the image away from the cardstock it was upon for even more impact.
Copper metallic paste on navy blue paper. Stunning! And easy! Look at all the texture it creates.
The two-tone watercolor technique makes another appearance. Of course this could be done with basic watercolors as well, but why not add a twist for even more beauty?!
And finally, the basic inking technique. Nothing wrong with good, old-fashioned, perfection on a card! I hope you enjoy the video and reference for ideas for the next time you grab a stencil and start creating a card!
I could not be happier today! Today is the day that I get to introduce my latest kit with Papertrey Ink called, Envelope Envy. This kit is above and beyond what I imagined!
"Envelope Envy has the stamps, dies, stencils, and papers to
help make your envelopes beautiful! In fact, your cards might start to get
jealous! Envelope Envy Happy Mail stamp set contains 15 images to adorn your
envelopes. The large flower border will look beautiful on the envelope flap, or
stamped over the address line image. No more crooked addressing with that three-line image. Add heartfelt sentiments anywhere on your envelope with the 6
sentiments. The largest sentiment also fits perfectly with the address line
image, so your recipient knows how special they truly are! Line your envelopes
with the envelope liner die and the exclusive 4x6 paper pad. This paper pad has
been specially designed to be lighter weight, so as to not add bulk to your
envelope. You will wish you could see the smiles when the envelope is opened to
reveal the liner patterns of happy words, polka dots, a large heart, or even a
large hello. Along with the envelope liner die, 6 other dies are included. Use these
dies to add custom seals to your envelopes, custom faux postage, or even cut
out your own address labels. Take your envelope flap to another level with new
stencils designed specifically for embossing. Each of the 7 stencils will leave
a beautiful finish on your envelope flap. The mix and match possibilities of
this kit are endless! Enjoy creating envelopes that will be the envy of all
mail!"
The kit will be available exclusively from Papertrey Ink tonight starting at 10 PM EST.
For a closer look at all the contents and project ideas from Envelope Envy, you can watch the video below:
To watch here, simply click the middle of the video.
The mix and match possibilities of this kit are truly endless! Over the next few days I will be sharing several "suites" of envelopes with you. Each of these groupings will show you different and unique ways to use the innovative products that I have designed and included in the Envelope Envy kit.
The first suite today is definitely a show-stopping piece! I began by stamping the flower border image in black ink around the outside edge of the envelope. Each flower was colored in with pencil. I found that if I placed a piece of cardstock inside the envelope, I could avoid having some of the lines of the envelope showing through the coloring.
The three-lined address image was stamped in Stormy Seas ink. I love the lines because I cannot write in a straight line!
To line the envelope, I used a striped piece of patterned paper from the paper pad. It was die cut with the envelope liner die in the kit. I love the detail of the small dotted edge all the way around! The light-weight paper also does not add bulk to your envelope. Which is important for mailing costs.
On the back of the envelope, on the flap, I inked through one of the stencils in the kit. Tropical Teal ink was applied. To close the envelope, I die cut a piece of the white sticker paper, also included in the kit, with the postage stamp die. I stamped a small heart and the word friend (masked off from one of the sentiments) onto the stamp and used it to "seal" the envelope.
No more plain envelopes! From simple stamping, to abundantly embellished, your envelopes will shine brightly and add even more love to your handmade cards!
To see more projects and for more information, be sure and visit Nichole's blog.
To work all the colors in on this card, I pressed each of the colors of ink pad into a craft mat. I spritzed each color with water to create watercolor. Using a wide paintbrush, I created stripes on a piece of watercolor paper.
I used Llama Love to create a scene on my background. Using the color palette from the challenge, I colored my images with color pencils.
Head to the MFT Stamps Card Challenges Blog and see what inspiration the rest of the team has in store and join in the challenge!
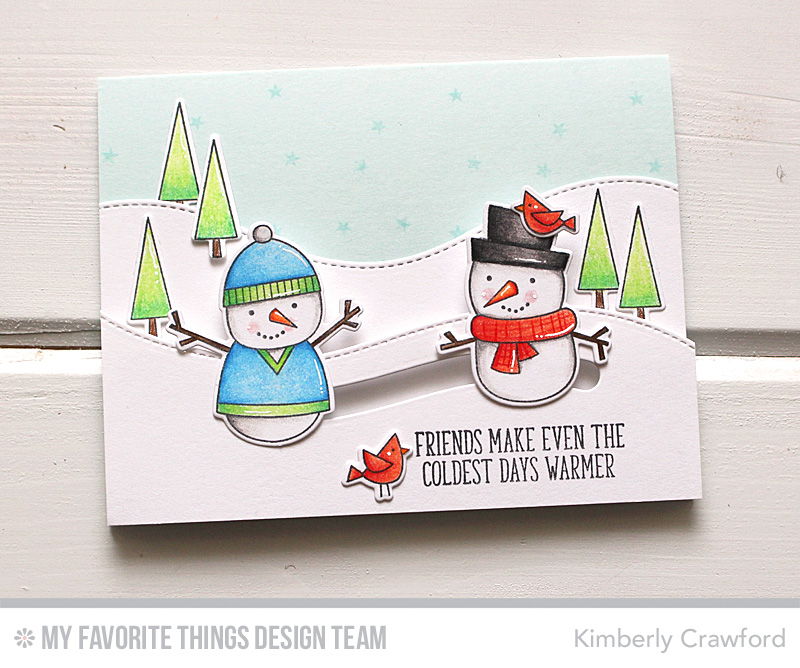
The latest MFT Stamps card kit is now available! This limited edition kit is called, Cooler With You, and it is adorable. Ad.or.a.ble! Cute stamps and coordinating dies, along with a set of dies to create snowbanks, and an interactive element-creating die are included in this kit! I don't know about you, but I am in love with making slider cards! Especially with how easy MFT Stamps has made it!
I colored the two snowmen from the set, because I wanted them to be able to slide towards one another and hug. The sentiment from the stamp set says, friends make even the coldest days warmer, and well, what is better than sending a hug to a friend?!
They are getting closer to a hug. Don't miss the great tree images from the kit. They are perfect for scene-building! And the little birds are fun to add also!
Visit the MFT Stamps blog for all the details about the card kit, Cooler With You. The blog will have specific details about everything included. Don't forget to check out what the rest of the design team has created. It never ceases to amaze me how talented those ladies are!
Today’s peek is a cute and easy to make chalkboard. You might want to save this project for later on in the year, but a new teacher might li...
All content, including text, photographs, and samples are copyright 2020 by Kimberly Crawford. They are shared here for your personal, non-commercial use, this includes contests, submissions, and publications. Any other use requires my written permission. Thank you.