Showing posts with label Color Block Stencils. Show all posts

Sunday, December 30, 2018

Happy New Year - a look back at 2018


Its almost time to ring in a new year! Hard to believe that 2019 is here already! 

I thought it would be fun to look back on a few of my favorite projects for the year. Underneath each photo, I will share a link to the original post. So if you want to learn more, or are interested in the products used, you can find it quickly and easily.

This first card may possibly be my favorite of the year. Reason being is, I envisioned this card quite a long time ago. Then, I was able to bring it to life, not only by creating it, but also using products that I designed! Once again releasing products with Papertrey Ink has been quite surreal! Its a huge learning curve each and every time. I am grateful for the challenge. But most of all, I am beyond thrilled when I see someone else using my products. Its indescribable really. Thank you for wanting to use the products that start as a crazy idea in my head. It truly is sharing a piece of yourself with the world when you design products. Thank you for encouraging me with your purchases!

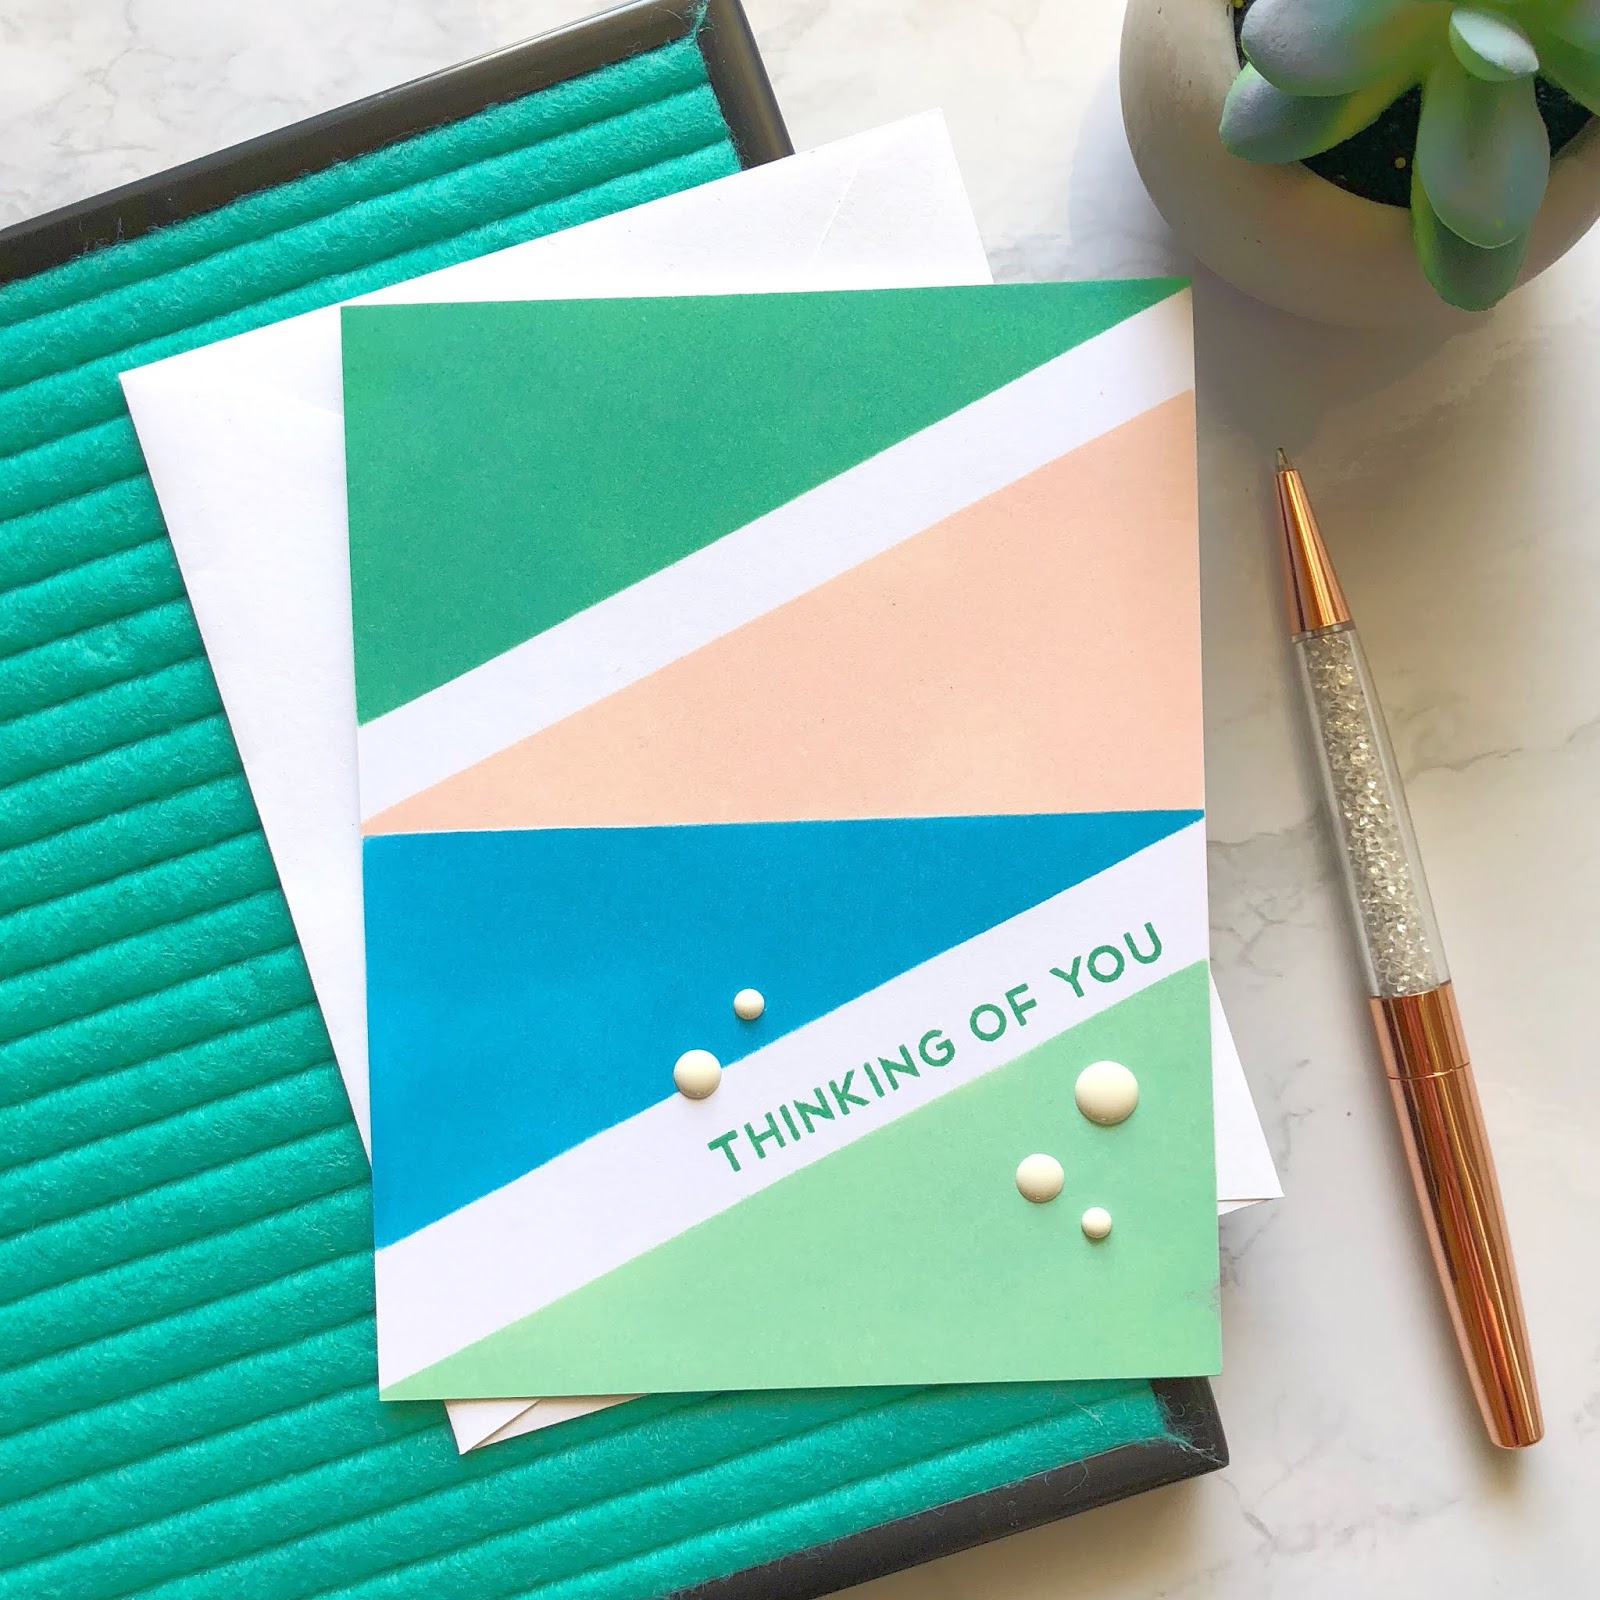
More craziness from inside my head. When I designed Color Block Stencils, I wanted the creation of a trendy, yet timeless, color blocked background to be simple. These stencils allow you to ink unique backgrounds easily, as they line up with the outside of a standard A2 card.

Bold Basics was a stamp set that I also designed to work with Color Block Stencils. How elegant is this card when paired with florals?! The color combinations are endless. From girly to a card for the guys, I am very proud of the stencils!

This Love Word die is another one of my designs, but this carries an even larger piece of me as that is my very own handlettering! I was writing the word for a lettering challenge and Jennifer McGuire saw it and said she NEEDED it as a die! After I picked myself up off the floor, of COURSE I made it into a die! :D 

While this word die was released for the wedding season, with Valentine's Day approaching, I will be taking it out again!! For a video tutorial on this die and all the creative ways you can use it click here: 10 Ways to Be Creative with Die Cut Words

This card is on the top of my favorites list for sure! Colored pencils combined with a beautiful stencil from Gina K Designs! Stencils are a personal favorite tool for me. So much so, that I created a video tutorial showing you: 

This card started my obsession with a fall color palette. It was inspired by a floral arrangement I saw at Michael's. Fresh and trendy, I continued to be head-over-heels for it for months! The gorgeous image from Gina K Designs didn't hurt things either. Also, pop over to the blog post and check out how an accident made a lovely accent on this card! 

My favorite fall color palette paired up with a Die Kit of the Month from Spellbinders on this card. Along with sneaking in my own Color Block Stencils. I still love gold...


More Spellbinders fun, along with Pebbles. Pebbles has this sweet aesthetic that always calls to me. I guess you could say it is my happy place for supplies! 


I had to share a layout for this year. I still love taking photos. So much. But, I often forget to share them. This layout was of a trip my husband and I took in February. My husband was a finalist for Engineer of the Year at his company. It was an impressive feat as there are over 6,000 engineers in his company! We were taken on an all-expenses paid trip to Palm Beach, Florida. However, our first trip alone in over 8 years was quickly ruined as we both came down with Influenza A. We spent the time in bed with Tylenol, in a stunning hotel, on the ocean. Glad I was able to capture a few lovely shots of the scenery before it all hit!
At least we were together...

Mail It Monday moved itself over to Instagram and the community has grown immensely! There are over 1400 card-mailers joining in each week! Encouraging one another to mail cards. We share card drives for those needing extra love. Friendships have been formed. Small groups of card exchanges have begun. Its been so wonderful to watch how it grows. We would love for you to join in as well! Find Mail It Monday on Instagram. And if you want to become involved, simply post with the hashtag #mailitmonday. Your post will remind people to send love, send cards.

Once again, I want to end this year full of thanks and gratitude. Thank you for continuing to visit me here and on Instagram and on YouTube. Thank you for the comments, emails, and messages. I love them all---from kind comments to questions! Thank you for purchasing items through my affiliate links.When you click, you sent a small amount of money back my way. Those purchases help pay for swim lessons, tuba lessons, bass guitar lessons, and more. Being able to help my family in this way means so very much to me! I would hug you, if I could! Thank you for continuing to love the paper crafting industry. For supporting all the small businesses run by moms like me. Thank you for buying my stamps and dies as well! Thank you friends, thank you from the very bottom of my heart. Hey, from the very tips of my toes!

Happiest of New Years to you and yours! May 2019 be full of more happiness than sadness, more love than loss, and more wonderful moments of life!

Sincerely Yours,
All supplies are linked in the original posts. Thank you!

Tuesday, August 14, 2018

Spellbinders August Large Die Kit of the Month

There isn't much better than getting new dies to play with, is there? Yes, I am a stamper, but there is something about using a die to cut a piece of paper that gets my creative juices flowing! The possibilities are truly endless when it comes to dies. Today I am sharing the Spellbinders August Large Die Kit of the Month. Spellbinders has fantastic options for their different kid clubs. If you love new products and especially new dies delivered to your door each month, visit their website for more information. You can find a link by clicking the names or by using the list at the bottom of this post.

How pretty is this image?! A flower and vines? Perfection! This intricate image can truly stand up on its own on a card. It really is a stunning focal point.

To help accentuate this gorgeous image, I created a background using my Color Block Stencils. The top was inked though the stencil. The rest of the layers were created by masking beyond the first line. I love the look! Its modern, elegant, timeless, and makes that die cut floral pop even more!

After die cutting the floral image from watercolor paper, I applied gold watercolor to the image. I used a smaller amount of water than normal because I wanted a more solid coverage. I also applied two coats of color, to cover up any white spots showing through.

The image was adhered with foam to more lift and life. A few sequins were also added for sparkle. I am obsessed with this color palette for fall, so yes, my next card is also the same colors. Why not go with what works, :D

When I get a new set of dies, I cut the image out several times. It allows me to move it, rearrange it, layer it, cut it, whatever to it. By doing that, I see what the die can do on a card. While playing around with more watercolored floral images, I saw that they came together, almost like a wreath.

I masked the background with Spellbinders Classic Ovals and inked in the same colors as above. Two floral images where adhered with foam, and again, those sequins in the perfect palette were added. I love the sequin in the center of the large flower, don't you?

I finished this elegant card of with a sentiment from my With All My Heart stamp set. It seemed like a wedding or anniversary card to me. So much warmth and rich color!

Speaking of anniversaries, today is our 19th wedding anniversary! Wow! Time does fly. But I can say, without a doubt, that I love my husband a little more each day. Its been a wonderful life so far! Looking back, its a beautiful thing to see our story unfold, and to see how God has held us and led us all these years. Here is to many more adventures together!

Sincerely Yours,
Supplies, affiliate links used:

Wednesday, July 18, 2018

thinking of you - trendy and fast card with Color Blocks Stencils

I have been having more fun exploring all the possibilities with my new stencils from Papertrey Ink called Color Block Stencils. This set of 5 stencils allows you to create trendy color-blocked backgrounds for your cards instantly. OR you can use them to mix and match and create something unique like this card here!

Instead of laying the stencil over the A2 sized piece of cardstock in the basic way, I started at the top and alternated between the two images on the stencil, using the edge of the card stock as my guide. 

One thing I did need to be careful of was making sure that I cleaned the stencil between ink colors. That also included changing my foam ink applicator between ink colors as well.

 Within a few minutes I had a complete card! Being able to make a card quickly is ideal for me and our busy lives. Handmade, hearfelt, but quick. Yes!
Each of these stencils has a million possiblities! To see a series of quick videos, visit my Instagram page @kimberlystamps. You can access my page quickly by clicking on the image to the right on my blog border. Once there, click into my stories and look for Sincerely Yours. You will be amazed at the innovation in these stencils! I could not love them more! 

What have you been creating with Color Block Stencils? Share with me via email or tag me on social media, I would LOVE to see! :D

 Sincerely Yours,


Saturday, June 30, 2018

New Sincerely Yours - Color Blocks Stencils and Bold Basics Stamp Set

Hello everyone! Its a fun Saturday surprise from Papertrey Ink and my line, Sincerely Yours! As part of the Summer Perks Promotion, I have 2 new products being released this morning! 

Color Block Stencils and Bold Basics Stamp Set are two products that have been in my head for so long, and to see them come to life is amazing! I cannot wait to see what you create!

Check out the video below to get a better look at Color Block Stencils and Bold Basics Stamp set. I have a few tips and tricks to share, but those peeks are just the beginning of the possibilities!


The idea behind Color Blocks is color blocking. You know, that bright, fun look from the 80's. But with the right color combinations, this look can create some incredibly elegant cards that have the look of high-end stationery.
For this first card, I inked through the stencils with a pale pink ink. Then added a stamped image through the stencil. 

This looks complicated, but its not. The Color Block stencils are designed to lay perfectly over the top of an A2 piece of cardstock. Place your cardstock down, layer the stencil over the top, and ink through with your favorite colors.

Supplies Hello Friend Card:


While the first card had lots of embellishments, this bright Happy Birthday card was made purely with Color Blocks and Bold Basics. I can see sending this to teen or college-aged girls. Its so fun!
To make this background, I combined two of the Color Block stencils. Inking them each separately. The elements in all the stencils can be mixed and matched to create some fun backgrounds. 
The striped image from Bold Basics was stamped and heat embossed in white powder. The sentiment is also from Bold Basics and looks full of energy stamped on the slant of the background. I found my MISTI to be very helpful when lining up the sentiment this way.

Supplies Happy Birthday Pink Card:

Don't tell the other cards, but this one might be my favorite! I found an ad on Pinterest the other night that had this layout. I grabbed my supplies and created this awesome card. Perfect for any boys or men in your life. It would be really great in their favorite sports teams' colors!
Don't forget about the envelopes when making cards. Color Blocks makes it easy to add pizazz to your envelopes too! 

Supplies Happy Birthday Blue Card:

This card highlights another fun feature of Color Blocks, the ability to flip, turn, reverse, or whatever with your stencils!
I began by placing my stencil down and applying the green ink. I flipped it over and inked through with pink and black. How cool is that? The part I love the most is the mix of the ink colors where the images intersect.
For a bit of shine, I added a line of gold gilding. It was created easily with Scor Tape. I applied two strips of the tape along the green edges, removed the backing, and applied gilding flakes over the top. I burnished the flakes into the adhesive with a small brush and a circular motion. Easy peasy and so elegant!

Supplies Thinking of You Card:

Flat, mail-able, and classy. Could there be anything better in a card?
This card started with the diamond image in Bold  Basics being stamped on the card. (Notice how the sentiment fits inside? All the sentiments in the set fit inside!)
Using only the very tip of one of the triangles in Bold Basics, I lined up the edge of the stencil with the outline of the diamond image and inked. Eeee! So many possiblities!

Supplies Thank You Diamonds Card:

More stamps and sentiments, all combining to make a truly lovely card.
I am fairly certain that you cannot go wrong with any way you put Bold Basics and Color Blocks together!
Both products are basic building blocks that have impact on their own, but look at what happens when you add in other elements? The card went from wow to WOWEE!

Supplies You Are The Best Card:

If you are still here, this card is for you. Thank you. Thank you from the very bottom of my heart!
I know that you will love making cards with these new and innovative products! And I cannot wait to see how creative you get. Be sure and tag me, or email me, or whatever when you make a card. It would mean the world!
Thank you for being so supportive as I have embarked on this new journey. Its hard to believe, but its been one year since I started designing products. What a challenge! What a thrill! I have learned so much and continue to learn every day. Thank you for being my cheerleaders. Thank you to the team at Papertrey who constantly help and answer questions and provide amazing insight. I am one lucky lady. Have fun shopping and have fun creating!

Supplies Thank You Flower Card:


Sincerely Yours,
P.S. As this posts, I am in Minnesota in the Boundary Waters Canoe Area on vacation with my family. I will pop in on social media, as I can find wi-fi. When I get back, I am planning on sharing video tutorials with you with more about these fun new products. Happy 4th of July everyone! :D
Related Posts Plugin for WordPress, Blogger...